Here's the setup mistake that costs new sweeps the most money and the most reputation: they think about their truck as a storage container. Something to hold their stuff between jobs.
Your truck is your office, your warehouse, your billboard, and your first impression — all in one. How you organize it determines how fast you work, how professional you look, and whether the homeowner trusts you enough to let you inside their house.
The philosophy that makes everything click is simple: clean side / dirty side. Separate your customer-facing, presentation-quality gear from your soot-covered, tool-heavy service equipment. When you operate from this framework, everything else falls into place.
The Clean Side / Dirty Side Philosophy
Why Separation Matters
A chimney sweep walks into a customer's home carrying soot, ash, and creosote residue on every surface of their working gear. That's the nature of the job. But the customer's first interaction with you shouldn't involve watching you dig through a pile of dirty rods to find a clean drop cloth.
The clean side is everything the customer sees and interacts with. The dirty side is your working equipment. They live in different compartments, different bins, and — in an ideal setup — different sections of the vehicle entirely.
This isn't fussy organizing for its own sake. A professional arrival protocol — clean uniform, organized presentation, clear communication — directly affects whether customers trust your assessment and act on your recommendations. When you find a cracked flue tile and recommend a $2,500 liner installation, the customer who watched you show up in a clean branded shirt with an organized tablet presentation is more likely to say yes than the customer who watched you rummage through a pile of black brushes.
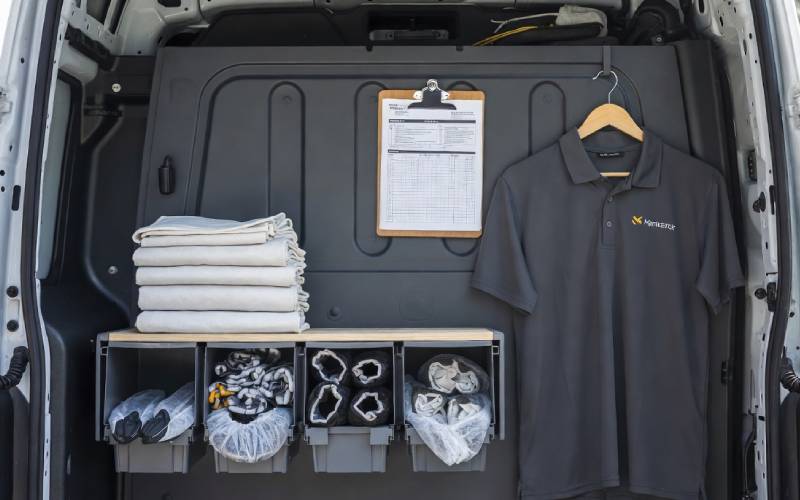
The Clean Side
This is what you carry into the customer's home or present during the walkthrough:
- Clean branded shirt or uniform — You wear this into the house. It stays clean. You change into coveralls or work clothes before touching anything sooty.
- Shoe covers or dedicated indoor shoes — Non-negotiable. You're walking on their floors. Disposable booties are cheap insurance against a carpet complaint.
- Drop cloths (clean, folded) — Non-permeable tarps that go down before anything dirty comes in. At least 2–3 per job.
- Tablet or phone for documentation — Your inspection camera, photo documentation, and report generation tool. Digital reports sent to the customer's email are table stakes now.
- Business cards and brochures — Leave behinds. Every job should result in a card on the mantel and, ideally, a card handed to their neighbor.
- Invoice pad or mobile payment setup — Collect payment before you leave. Square, Stripe, or QuickBooks mobile. Cash and check are declining but still common.
- Customer communication materials — Appointment confirmation printouts, warranty documentation, maintenance recommendation sheets.
The Dirty Side
This lives in the back of the vehicle, in bins, on racks, and it comes out at the job site — not in the customer's living room:
- Chimney brushes — Multiple sizes. Wire brushes for masonry flues (6", 8", 10", 12" round; 8x8, 8x12, 12x12 square). Poly (polypropylene) brushes for metal and prefab flues. A smoke chamber brush with a U-shaped head for parging work.
- Flexible rods — Fiberglass or nylon, typically in 3–5 foot sections. You need at least 40 feet total to handle most residential flues. Buy decent connectors — cheap ones come apart inside the flue and ruin your day.
- Rotary cleaning system — Drill-powered spinning head for aggressive creosote removal. Essential for Stage 2 and Stage 3 creosote.
- HEPA ash vacuum — This is the single most important tool you own. A proper HEPA-rated vacuum captures particles down to 0.3 microns. A regular shop vac blows fine ash back into the air and onto everything in the room. Budget $400–$800 for a quality unit.
- Secondary shop vac — For general cleanup, vehicle cleanup, and jobs where the HEPA vac isn't necessary.
- Ladders — Extension ladder (28–40 ft depending on your market), roof ladder / chicken ladder, and a step ladder for interior work. Ladder levelers for uneven ground.
- Fall protection — Harness, roof anchor system, and lanyard. Not optional. Falls from height are the most common serious injury in the trade.
- PPE — N95 respirator (minimum), PAPR for heavy jobs, sealed safety goggles, work gloves, coveralls, steel-toe boots, knee pads, hard hat for commercial work.
About that PAPR: a Powered Air-Purifying Respirator costs $300–$600 but it's transformative for heavy creosote jobs. Brands like Gentex Pureflo, CleanAir Ready 2 Work, and Powercap Active provide HEPA-filtered airflow that protects your lungs without the breathing resistance of a standard N95. Chimney sweeps have documented elevated cancer rates from long-term soot and creosote exposure. This isn't a piece of gear to cheap out on. Think of it as health insurance that actually works.
The Vehicle Question: Van vs. Truck vs. Trailer
The Three Options
Every new sweep agonizes over this decision. Here's the honest comparison:
| Option | Pros | Cons | Cost Range |
|---|---|---|---|
| Cargo Van (Ford Transit, Chevy Express, Ram ProMaster) |
All-in-one. Weather-protected tools. Walk-in access. Professional appearance. Easy to brand. | Higher purchase price. Limited by interior height. Can't leave tools and drive personal vehicle. | $5K–$15K used $30K–$45K new |
| Pickup Truck + Cap/Topper | Lower entry cost. Can double as personal vehicle. Easy to add ladder rack. Good ground clearance for rural areas. | Tools less organized. Weather exposure when loading/unloading. Less professional impression than a van. | $5K–$20K used $25K–$40K new |
| Pickup/SUV + Enclosed Trailer | Dedicated mobile workshop. Can unhitch and use vehicle separately. Scalable — swap trailers for different work. | Hardest to maneuver in residential driveways. Parking challenges. Two vehicles to maintain. Requires towing capacity. | $3K–$8K for trailer + vehicle cost |
The Verdict
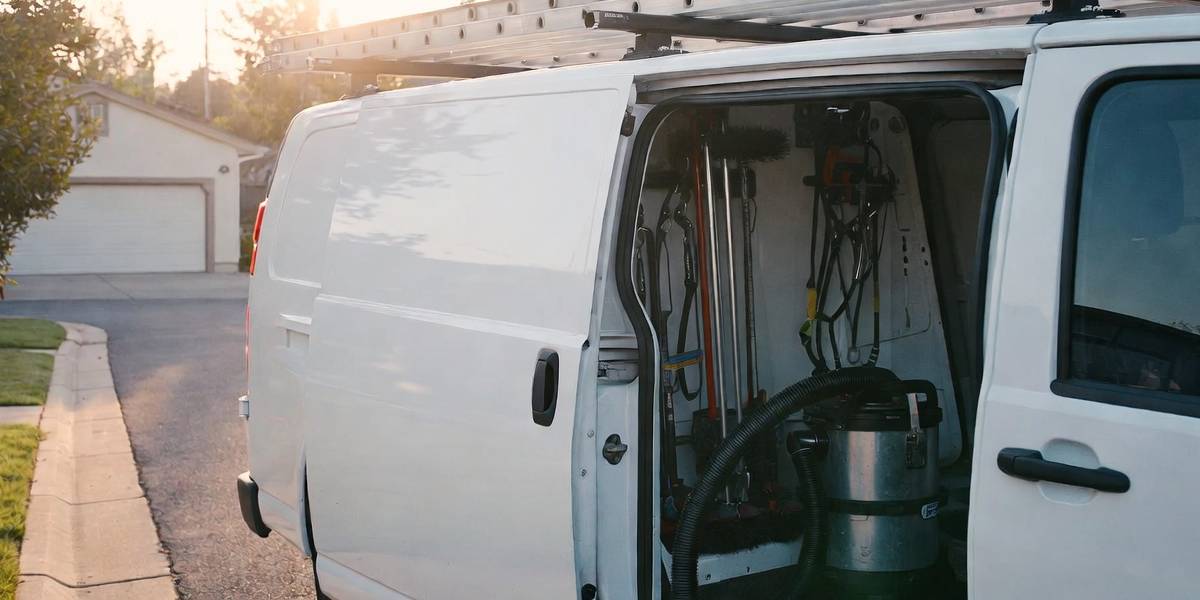
The cargo van is the industry standard for a reason. Most established solo sweeps run a full-size cargo van (Ford Transit, Chevy Express, or Ram ProMaster) with a bulkhead separating the cab from the cargo area, a ladder rack on top, and organized shelving inside.
If budget forces you to start with a pickup truck, that's fine — it works. But plan to move into a van within a year or two. The organizational efficiency and professional appearance of a clean, branded cargo van is a meaningful business advantage.
The branding question: At minimum, get magnetic signs with your company name, phone number, and CSIA certification logo. They cost $100–$200 and you can remove them if you use the vehicle personally. A full vehicle wrap runs $2,000–$5,000 but turns every drive and every job site into a mobile billboard. Budget this for when the business is generating consistent revenue — it's one of the highest-ROI marketing investments you can make.
The Starter Kit: What to Buy Now
Here's a realistic Day One equipment list — the minimum viable toolkit for a chimney sweep who wants to do professional-quality work:
| Item | Specs | Budget |
|---|---|---|
| HEPA ash vacuum | HEPA-rated, designed for fine ash/soot particles | $400 – $800 |
| Wire brush set | 3–4 common sizes (8", 10", 12" round + one square) | $100 – $200 |
| Poly brush set | 2–3 sizes for metal/prefab flues | $60 – $120 |
| Flexible rods | 40 ft total in 4–5 ft sections, quality connectors | $150 – $300 |
| Drop cloths | Non-permeable, 3+ heavy-duty tarps | $50 – $100 |
| Extension ladder | 28–32 ft, fiberglass (for electrical safety) | $200 – $400 |
| Roof ladder | Hooks over ridge, distributes weight | $80 – $150 |
| Fall protection | Harness + roof anchor + lanyard | $100 – $250 |
| Respirator | N95 supply + consider PAPR for heavy jobs | $30 – $500 |
| PPE kit | Goggles, gloves, coveralls, steel-toe boots, knee pads | $150 – $300 |
| Flashlights | Headlamp + handheld, both high-lumen | $30 – $60 |
| Basic hand tools | Tape measure, screwdrivers, wrenches, trowels | $50 – $100 |
| CO detector | Handheld gas sniffer for carbon monoxide | $30 – $150 |
| Inspection mirrors | Extendable, angled for smoke chamber visibility | $15 – $30 |
| Total starter kit | $1,445 – $3,460 |
This gets you through the door for standard cleanings and Level 1 inspections. It's professional, safe, and sufficient.
The Wish List: What to Add After Six Months
Once you've got revenue flowing and you know you're staying in the trade, these upgrades dramatically expand your capability and revenue potential:
Chimney Inspection Camera ($600 – $2,000)
This is the single most impactful upgrade you'll make. A proper chimney camera — brands like Wohler, Sweeper Peeper, ChimScan, or Ridgid — transforms your service from "I cleaned it" to "I documented every inch of the interior on video."
The camera unlocks Level 2 inspections (which NFPA 211 mandates cannot be performed without image scanning equipment). It also makes your Level 1 inspection findings dramatically more persuasive. When you show a homeowner camera footage of a cracked flue tile, the conversation shifts from "Are you trying to sell me something?" to "How soon can you fix that?"
Prices have dropped significantly in recent years. Professional-grade cameras that cost $3,000+ five years ago are available for $600–$1,500 today. This is the best ROI purchase you'll make after your HEPA vacuum.
Rotary Cleaning System ($200 – $400)
A drill-powered rotary sweeping system with spinning heads is essential for Stage 2 and Stage 3 creosote. Standard brushes and rods handle Stage 1 (dusty, flaky deposits). When you encounter the hard, tar-like buildup of Stage 2 or the glazed, rock-hard deposits of Stage 3, you need mechanical agitation that a manual brush can't provide.
Smoke Chamber Brush ($40 – $80)
The U-shaped brush head designed for cleaning and prepping smoke chambers. If you're going to add smoke chamber parging to your service menu ($1,000–$2,000 per job), you need the right tool.
Vehicle Shelving and Organization ($200 – $600)
Commercial van shelving systems (Ranger Design, Adrian Steel, WeatherGuard) turn a cargo van from a cluttered box into a professional workspace. Bins for brushes sorted by size. Hooks for rods. Shelf for chemicals. Drawer for PPE. The time you save not searching for tools across 500 jobs a year is enormous.
Supplies to Carry in Stock
Once you know what sells in your market, start carrying common repair materials:
- Chimney caps — 3–4 popular sizes. Install one during the cleaning appointment and you've added $150–$500 to the ticket with 30 minutes of work.
- Crown sealant — Products like CrownCoat or Saver Systems for minor crown repair. $150–$600 per job.
- Waterproofing sealant — ChimneySaver is the standard. Apply it during the same visit. $150–$500.
- High-temperature caulk — For minor firebox repairs and sealing.
- Damper replacement parts — Top-mount dampers in common sizes for the $400–$1,500 damper replacement service.
- Mortar mix and trowels — For small repointing jobs you can handle on-site.
The on-site close advantage: Conversion rates for repairs offered during the cleaning visit run 40–60% for items under $500. Follow-up estimates sent days later close at 20–35%. The difference is immediacy and visual evidence — the customer is standing next to you looking at the problem in real time. Every cap, every crown sealant application, every waterproofing job you can close on the spot is money that would otherwise leak out of your pipeline.
Organization Systems That Actually Work
The Bulkhead Principle
If you're in a cargo van, install a bulkhead (solid partition) between the cab and the cargo area. This does three things:
- Protects your lungs. Soot and creosote dust in the cargo area doesn't migrate into the cab where you're breathing for hours of drive time.
- Protects your image. When you open the side door for a customer, they see organized shelving — not a mess visible through the windshield.
- Protects your stuff. In a sudden stop, tools and equipment don't fly forward into the cab.
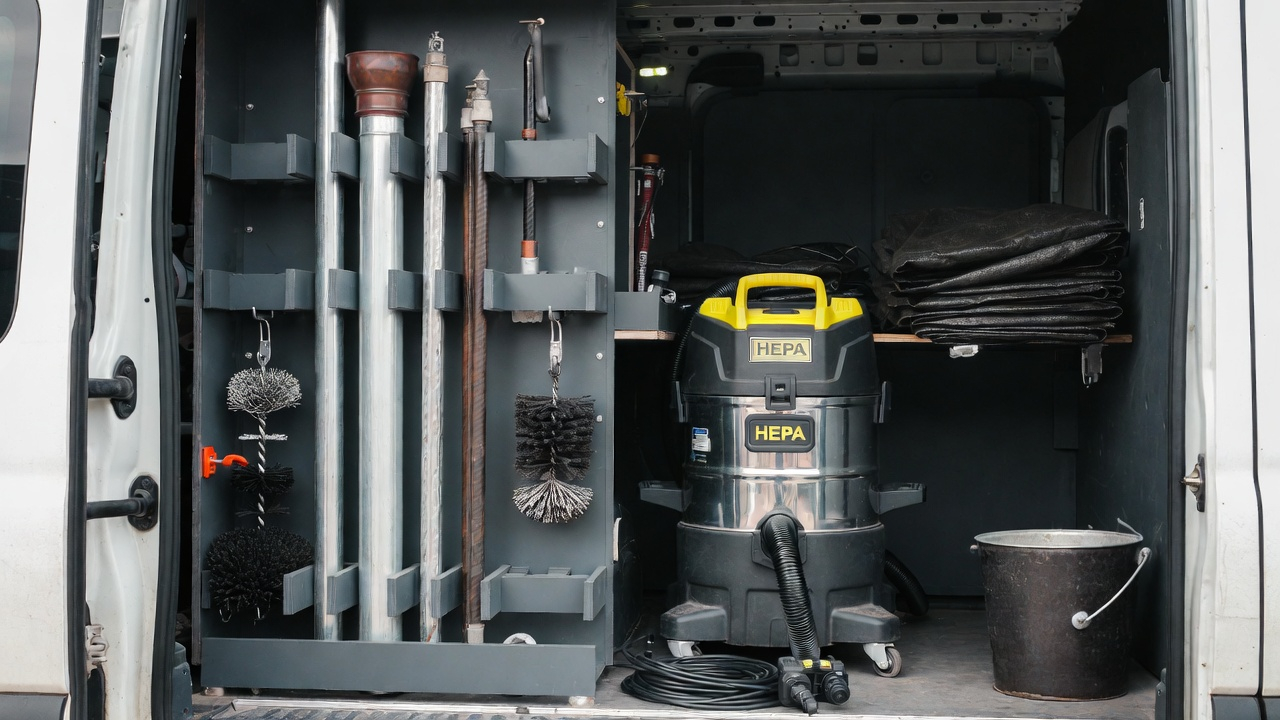
Rod and Brush Storage
Your rods and brushes are the tools you use most frequently and the ones most likely to create a tangled mess. Effective storage options:
- PVC tube rack — Vertical tubes mounted to the van wall. Rods slide in and out cleanly, grouped by type. Cheap to build from hardware store materials.
- Horizontal rod rack — If ceiling height allows, a ceiling-mounted rack holds rods parallel to the floor. Easy access, no floor clutter.
- Dedicated brush bin — Wire brushes in one bin sorted by size. Poly brushes in another. Labeled. When you need a 10" round brush, you grab it in three seconds instead of digging through a pile.
The Ladder Rack
Extension ladder and roof ladder live on top of the vehicle. A quality ladder rack (Kargo Master, Adrian Steel) with easy-release locks saves minutes at every job and reduces the risk of a ladder sliding off during transit. Budget $200–$500 for a proper rack system.
Drop Cloth Protocol
Clean drop cloths and used drop cloths don't mix. After each job, fold the used cloths soot-side-in and bag them. Carry at least 3 clean sets so you're never laying a dirty tarp in a customer's home. Wash or replace on a regular rotation.
Maintenance Realities
Your equipment is your livelihood. Here's what the ongoing maintenance cycle actually looks like:
| Item | Maintenance | Annual Cost |
|---|---|---|
| Vehicle | Oil every 3–5K miles, tires, brakes, transmission | $2,000 – $4,000 |
| HEPA vacuum | Filter replacement monthly to quarterly | $100 – $300 |
| Brushes | Replace when bristles worn/bent | $200 – $500 |
| Rods | Inspect for cracks, replace damaged sections | $100 – $300 |
| Camera | Clean lens after each use, inspect cable | $50 – $200 |
| Ladders | Inspect for damage, replace worn feet | $50 – $100 |
| PPE | Filter replacement, harness expiration check | $100 – $200 |
| Total annual maintenance | $2,600 – $5,600 |
These aren't optional expenses. A vacuum with a clogged filter doesn't contain soot. A brush with worn bristles doesn't clean the flue. A harness past its expiration date doesn't catch a fall. Budget for maintenance from Day One and treat it as a non-negotiable operating cost.
The Professional Arrival
Everything about your truck setup culminates in one moment: when you pull into the customer's driveway and they look out the window.
Here's what they should see:
- A clean, branded vehicle parked professionally (not blocking the driveway or on the lawn).
- You stepping out in a clean shirt with company branding, carrying a tablet and a professional demeanor — not wrestling a vacuum out of a pile of rods.
- An organized presentation at the door: business card, explanation of what you'll do, asking about their concerns.
- Protection going down first — shoe covers on, drop cloths laid before anything else enters the house.
That sequence takes two minutes and costs nothing. But it sets the tone for the entire appointment. The customer who sees a professional arrival trusts the professional assessment. The customer who trusts the assessment acts on the recommendations. The recommendations generate repair revenue.
Your truck setup isn't about tools. It's about the system that turns a service call into a relationship.
The post-job protocol that books next year: After cleanup, walk the customer through your findings with photos on your tablet. Present the written report. Discuss any recommendations calmly and without pressure. Collect payment. Then, before you head to the door: "Let me get you scheduled for next fall before I head out — it's a lot easier than trying to book during the October rush." That one sentence, repeated 400 times a year, builds a self-renewing customer base that doesn't require marketing spend.
You've got the truck. Now protect the business.
Your documentation is what stands between your business and a lawsuit. Next up: the five layers of documentation that every sweep needs.
Next: Documentation Is Your Liability Shield →